The proven marks of modern laboratory design are sharing of resources, flexible use of space, and the ability to adapt to changing needs. In constructing various laboratories throughout the years, Hendrick Construction (Charlotte, NC) has found that certain challenges arise in many projects. Whether it is a middle school science laboratory, university research laboratory, government research and development facility (Figure 1), or private industry manufacturing environment, challenges have a commonality specific to laboratory construction. Thus, coordination with all stakeholders, including the design team and fixture manufacturers, is essential for a cost-effective and smooth construction process.
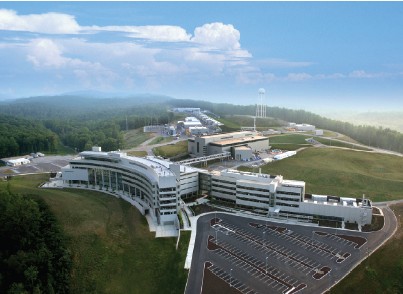
Figure 1 - Hendrick Construction recently completed a 14,000- square-foot expansion of the Spallation Neutron Source Central Lab and Office Building at Oak Ridge National Laboratory (Oak Ridge, TN). The project, which created 13 new laboratories to support scientific research, required the installation of various instruments and controls, as well as
complex chemical storage, electrical, and ventilation systems. The laboratories will serve various needs, including X-ray, wet chemistry, magnetic materials characterization, protein crystallography, and neutron optics.
The information given in this article is not intended to be a checklist or suggestion for how to plan and construct a laboratory, but rather underscores important considerations when creating a custom environment. The examples below help to address many of the perennial challenges in creating laboratory spaces in a facility.
Budgeting
Hendrick Construction has been part of several projects in which the budget was based on previous projects and set by the accounting department, with very little input from the end users. For example, new items had not been contemplated, such as exhaust hoods that require double the cubic feet per minute (CFM) ventilation than the previous project; codes that changed since the last project and a fire alarm system that cost twice as much; internal protocols that changed; and a chemical disposal and handling process that was completely different. Deadlines are tight, and during the concept phase it is difficult to focus on the details. However, there is a happy medium between relying on historical data and accounting for every new outlet and cabinet drawer.
Coordination
Coordination is critical for a successful laboratory project. The laboratory’s overall quality, usefulness, flexibility, and cost all stem from this. End users need to have design input early and often in the process. They must successfully communicate their needs and desires to the design team. The next phase involves the design team, contractor, and vendors.
The design team and contractor have to collaborate closely to ensure that systems will work together and fit within the desired envelope. This is a necessary step prior to completion of the design documents. Sanitary sewer systems are a prime example. The slopes for these systems are dictated by building code and good construction practices. Ceiling space is often limited. Once the plumbing contractor arrives and starts running the waste lines, it is too late to alert the owners, for example, that they will have a waste line running 6 inches below the 9-foot finished ceiling in Labs 134 through 145. This problem can be discovered at a contractor coordination meeting after the design is complete, but it is preferable for the contractor and designer to identify items like this long before.
Kickoff meeting
End users may not understand the details of drawings and specifications; thus a facilities department may act as a liaison between the designer/contractor and the end user. Some of the best project kickoff meetings occur when all parties, including the end users, convene and review the documents item by item.
On a recent project, the Hendrick Construction team installed the casework exactly as designed. The designer supplied the precise amount of shelving requested, but the owner noted that the top two shelves were too high in every room and were unusable. There were only 12 inches from the top shelf to the ceiling, which the end user felt was too low for storage. This information had been conveyed early on but the plan was never carried through. This may have been noticed during weekly project walk-throughs, but by then it would have been too late, i.e., the design was already complete, blocking had been installed behind the walls, materials had been purchased, and in some cases the product had been installed. Kickoff meetings can prevent such problems.
Cost control for equipment and material selections
In the construction world, technology gives us the ability to quickly capture and utilize information from previous projects without having to “reinvent the wheel.” The downside is that one can easily end up with a product that worked for someone else, but really does not fit the current application. The team—including the owner, designer, contractor, and vendor—can often be guilty of the “cut-and-paste syndrome,” i.e., “It worked before and will work again.” Flooring is a good example. Products can be installed ranging from $2 per square foot to $40 per square foot. Questions to consider are: Is it a high-traffic area? Will there be many carts or just foot traffic? Do any areas or equipment require electrostatic discharge protection? What kind of chemicals will be used? What is the concentration level? What are the likely uses of this space in the future? Is the end user’s maintenance staff qualified to maintain this floor?
The “this worked last time” approach is a good starting point, but not the end of the decision-making process. The rule of thumb is: Drill down to the very specific identification of “needs,” and then keep a separate list of “wants.” It is very easy to go up or down a couple of dollars per square foot of laboratory space on key items. One item typically does not destroy the budget on its own, but $2 per square foot on six major systems and components adds up quickly. If the design is done and the project has bid, it is the worst time to value engineer things backwards into a perceived budget.
Timing of selections and decisions
A common myth in the industry is that the design documents can be completed (i.e., plans and specifications) and owner equipment selections can be made later. On drawings, space is usually reserved for an average-sized piece of equipment with nominal dimensions. Several manufacturers may be listed as prequalified suppliers for contractor-provided items in the specifications. In other cases, the end user may plan to purchase the equipment, and specifics are not available at the time the infrastructure rough-in is being performed. Power and voltage requirements can vary greatly. The size of exhaust connections, height of outlets, custom National Electrical Manufacturers Association (NEMA) configurations, and drain locations can create substantial delays and reconfiguration costs if they are not finalized in time.
Documentation during construction
Because the laboratory environment will change over time, infrastructure behind walls and above ceilings needs to be accessed. It is essential to maintain good as-built drawings that are updated and reviewed weekly. They need to be dimensioned in a user-friendly format. If drawings are not done as each pipe is installed, as well as at the end of the project, they are worthless.
Another invaluable tool is to digitally photograph each area as it is completed. The team should plan how and where to document exact locations of valves, cleanouts, and places for future tie-ins. These will complement the as-built drawings, and in the case of an emergency or modification, they will save valuable time and resources.
Future expansion and modification considerations
Making provisions for future changes and expansions can be done much more economically and easily during the project rather than later. Examples such as spare conduits, tees, and valves on piping for future tie-in points are sometimes overlooked. In addition, construction schedules are often given a lower priority than the needs of those still occupying the space. Although delays should be expected and the flow of work may need to be shifted, progress does not have to stop completely.
Planning for maintenance
The maintenance team should review the documents early in the process. Hendrick Construction worked in an existing facility where the only way to access the dampers was to crawl over a ceiling with no walkway access. Accessing the ceiling from below would break the integrity of the sealed barrier and introduce contaminants into the space. Accessing the damper through the ductwork would break seals between sections and create a leakage into the plenum. Neither was a good option and could have been prevented by better team planning.
The maintenance team can walk and review the ceiling and concealed spaces before they are covered. This is also an optimal time to discover if a valve handle will hit a nearby pipe when it is in the “off” position.
Miscellaneous architectural features
There are many features to consider during the planning process, such as specialized equipment and the mechanical and electrical infrastructure. Examples include oversized door openings and inactive leaf designs, which can be specified for oversized equipment mobilization. Recessed emergency eye wash and shower stations can incorporate fire extinguisher and fire blanket storage to save floor space.
Also important is space flexibility, which allows for changes in techniques, instruments, and equipment to evolve with the scientific research. Open space and lack of permanent fixtures allow for versatility with mobile laboratory furniture. Without fixed furniture and equipment, virtually everything—work surfaces, shelving, equipment, and cabinetry—can be moved into a position to permit efficient research. The flexibility of the design is instrumental in reducing future life-cycle replacement and renovation costs.
Mechanical systems
Laboratories contain specialized mechanical systems. For example, fumehood exhaust systems, which feature a control system with a variable air volume valve, use automated sensors to communicate with extreme accuracy. The valves react to sash demands in less than a second. To increase safety during the sash opening setup, exhaust demands made on the valve must be met immediately rather than waiting for a standard system to catch up to the demands of the user. To reduce clean air usage, only the necessary amount of clean air is pulled from the space.
With spare equipment and future expansion exhaust connection points, most laboratory spaces use flexible hoses to provide additional duct connections to the building’s exhaust system. This allows for flexibility with gas-emitting equipment and instruments connected to the exhaust system. Exhaust ducts should be placed in locations that enable the addition of fumehoods as needed.
Many laboratory spaces are equipped with connection points to the cold water spray and rinse system. The locations enable hook-ups to equipment and instrument chillers required for experiments. It is also important for laboratories to be equipped with valves below the ceiling that can be accessed by users, which minimizes the involvement of the facility’s mechanical technician.
Electrical systems
Individual laboratory spaces have their own electrical panel service. In some cases, one single laboratory has three subpanels from the building’s main power distribution system. Multiple panels reduce issues with surrounding laboratory spaces during scheduled power outages or modifications to a laboratory space. Subpanels should be in a common space where facility electricians can service them without intruding into the laboratory, which minimizes exposure of nonusers to the laboratory space.
Another important laboratory system to plan for is a below-ceiling cable management system, which is installed in all user laboratory spaces. The below-ceiling installation permits cord management of mobile equipment. Commonly referred to as a whale bone rack system, it is installed along all perimeter walls and is suspended from the ceiling in a grid-type pattern, which allows for access paths to all locations in the laboratory space. It also allows for flexibility in the setup of laboratory equipment, since instruments can be moved from one corner of the space to another without dragging cords along the floor. Additionally, the system increases safety by keeping cables and power cords off the floor.
Conclusion
Successful laboratory construction requires coordination from all parties involved—from the design team to the end user. Problems will arise with every project, but they can be overcome by sharing resources, flexible use of space, and the ability to adapt to changing needs.
Mr. Hendrick is President, Hendrick Construction, 9144 ArrowPoint Blvd., Ste. 150, Charlotte, NC 28273, U.S.A.; tel.: 704-887-0280; fax: 704-887-0281; e-mail: [email protected].